Fukushima Daiichi & Japan

On Friday, March 11, 2011 at 2:46 in tragic incident hit Great East Japan. An earthquake with a magnitude of 9.0 had hit but that wasn’t all. This earthquake was so massive  it gave a rare and complex double quake  that had a severe lasting of three minutes. Following this earthquake was a 15-metre tsunami. This tsunami disabled the power supply and cooling of three Fukushima Daiichi  reactors. Within this tragedy, all three cores of the Fukushima Daiichi reactors melted in the first three days and a total of four reactors were written off because of the incident.

Imagery in the News, EIJournal.com, Earth Imaging Journal, Satellite Images, Remote Sensing

This earthquake and tsunami duo cost plenty of damage to Japan, imaginably so.

  • the tsunami inundated about 560 sq km
  • resulted in human death toll of over 19,00
  • and created  damage to coastal ports and town with over a million buildings destroyed or partially collapsed

Fukushima Plants:

there was the Daiichi and the Daini. The Daiichi was built at 3.1 based on assessments from the Chile tsunami and revisions made in 2002, but unfortunately after this accident it was under some 5 meters of seawater. The Daiichi was the most affected. The earthquake itself didn’t cause any harm to the reactors, in fact he operating units 1-3 were shut down because of it.
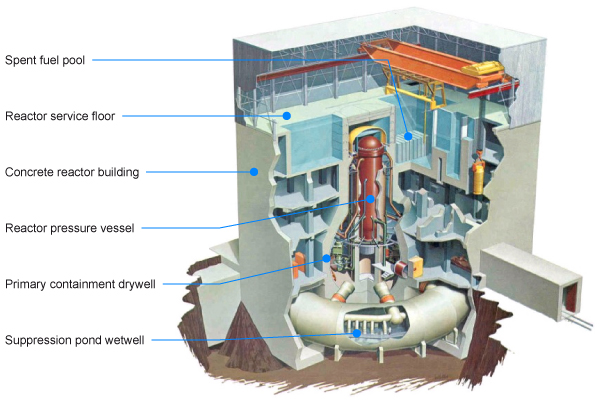
BWR 3

“When the power failed at 3.42 pm, about one hour after shutdown of the fission reactions, the reactor cores would still be producing about 1.5% of their nominal thermal power, from fission product decay”. From the moment the tsunami hit, till the days after things went downhill. world-nuclear.org has a wonderful chart explain what shut down and and what time it happened.

Event sequence following earthquake (timing from it: 14:46, 11 March)

Unit 1 Unit 2 Unit 3
Loss of AC power + 51 min + 54 min + 52 min
Loss of cooling + 1 hour + 70 hours + 36 hours
Water level down to top of fuel* + 3 hours + 74 hours + 42 hours
Core damage starts* + 4 hours + 77 hours + 44 hours
Reactor pressure vessel damage* +11 hours uncertain uncertain
Fire pumps with fresh water + 15 hours + 43 hours
Hydrogen explosion (not confirmed for unit 2) + 25 hours
service floor
+ 87 hours
suppression chamber
+ 68 hours
service floor
Fire pumps with seawater + 28 hours + 77 hours + 46 hours
Off-site electrical supply + 11-15 days
Fresh water cooling + 14-15 days

* according to 2012 MAAP analysis

There was so much damage because of this such as fuel ponds and radioactive that was released into air. Due to this people where evacuated from the zone, that by March 12th was extended to 20 km from the plant.

Damages from this disaster lasted till December of that year.

Japan’s New Strategy:

Although there was a promise made by a previous government, approved was a strategy first proposed by the government of Prime Minister Shinzo Abe. “This plan summarizes Japan’s challenges of policies to be tackled, and its lines of long-term, comprehensive and systematic energy policy”. Since this accident there has been an immense amount of things done to prevent an incident of this magnitude to happen again. The radioactive in the water has been recorded stable as of 2015.


References:

  • http://www.world-nuclear.org/info/safety-and-security/safety-of-plants/fukushima-accident/
  • http://www.nytimes.com/2014/04/12/world/asia/japan-new-energy-strategy-approved.html?_r=0
  • http://www.enecho.meti.go.jp/en/category/others/basic_plan/pdf/4th_strategic_energy_plan.pdf

Nuclear Energy Self Study

While doing my self study of nuclear energy there was plenty of information that I’ve learned that I did not have knowledge beforehand.

Things I learned:

  • The “economic advantages” slide alone was mostly filled with information was not aware of. For example that 17% of the world’s electricity is from nuclear power.
  • I had learned before about the splitting of atoms, and also of fusion but this self study reminded me of the correct term: Fission
  • Before this self study, I did not know that there were types of radioactivity, and all of the sources of natural radiation, especially soil and air.
  • On the topic of radiation, I also learned that from 1940-1970 most radioactive waste was dumped into the ocean. After discovering this I couldn’t help but wonder how much damage that costed.
  • A funny thing that I learned from this study was the yucca mountain. Being born and raised in Brazil, for me yucca is a food and many Americans have never eaten yucca before and reading about yucca mountain I wonder if it has anything to do with the food.

Presidents Climate Action Plan

“All of us will need to do our part. If we embrace this challenge, we will not just create new jobs and new industries and keep America on the cutting edge; we will save lives, protect and preserve our treasured natural resources, cities, and coastlines for future generations.”

This by far was one of the most striking lines in the reading from President Obama’s climate action plan. A plan he put forth in 2009 to reduce carbon pollution to better our planet in various ways for our future generations. In this plan he talked about three specific pillars.

1. Cut Carbon Pollution in America: 

President Obama set a goal in 2009, that by 2020 he would reduce U.S. greenhouse gas emission at around 17% below the 2005 levels. So far the Obama Administration have been doing a good job at trying to complete this goal. They have doubles the generation of electricity from wind, solar, and geothermal and also by setting forth historic new fuel economy standard. In this pillar is set up with steps that the Administration plans to take, such as deploying energy, which include cutting carbon pollution from power plants. If the Administration follows these steps, along with us and local governments we can start to create a better environment for the future generation.

2. Prepare the U.S. for the Impacts of Climate Change:

Over the past several years we, across the United States, have experience some of the most traumatic climate changes ever seen. With continues days of 100 degree weather, severe winters, and droughts. This part of the plan focuses on acknowledging these weather changes but also being prepared for them. Meaning that the Obama Administration will work with state and local governments to improve our roads, bridges, and shoreline for the protection on our people and businesses in due of these severe weather changes. Moving forward the Administration will spread efforts in three parts to prepare America. These include; building stronger and safer communities and infrastructure, protecting our economy and natural resources, and using sound science to manage climate impacts.

3. Lead International Efforts to Combat Global Climate Change and Prepare for its Impacts:

Tying in with the second pillar, the third pillar talks about how we, as a country, can’t face this challenge of climate change alone. With this part of the plan the Administration focuses on the “United States to couple action at home with leadership internationally” and that “America must help forge a truly global solution to this global challenge”.

I have briefly heard about the President’s plan, but never really got into depth with this plan. Reading this definitely made me more aware of what will happen and what I can do to help. I, too believe that not only should we be prepared for these climate changes we have been experiencing (especially after last winter in New England) but also aim to make this planet safe and healthy for our future generation. Coming from a family who has a history of asthma, I do feel this is very important.

Trip to the MOS

This trip to the Museum of Science was the first time I’ve been there in a very long time, but everything was still exactly as I remembered. I was very surprised, that with my knowledge of the class now, there were so many exhibits what had to deal with what we have been talking about in our class. We visited four exhibits; Catching Wind, Investigate!, Conserve @ home, and Energized!

Energized!

IMG_4481Energized was the first exhibit we did, there was a lot there that we had already spoken about in class and that was really cool to see example and pictures right in front of me instead of hearing it and being taught. In this exhibit there was a lot about solar powers and a very cool little example that we used light reflected off of a mirror to make a wheel turn, the more light we shined the faster the wheel turned. Being a student that learns with more hands on, it was really nice to see that and understand it.

heres more from energized

IMG_4477 IMG_4480


Catching Wind:

Next was catching wind and when we started looking at the exhibit I immediately heard professor Sonek speaking. This was exactly everything we had talked about in class previous weeks. It had things Energy sources and mentioned things we spoke about in class and words that when I read light bulbs started glowing like natural gases and solar power etc.

IMG_4479


Investigate!

IMG_4482


This exhibit is tied for my favorite with conserve @ home. This exhibit was just so interesting to me because it had everything to do with my everyday life but at the same time it didn’t and it was just so intrigued. It explained what happens when flush your toilet and what happens when your drain clogs and it was so interesting because I never thought of “what happens” and it was cool to learn. I actally caught myself staring at one specific part that showed what happened when you put certain objects (light bulb, CD, DVD, bar of soap, and a peep candy) in a microwave. I was so surprise at 1: what happened to the soap, my prediction was that it would melt but instead it grow as it if was being peeled. and 2) the lightbulb, I for sure thought it would explode in there and instead it kept lighting up!

IMG_4486


Conserve @ Home: 

Again this one tied for first for me.

IMG_4488


This was a very small exhibit but filled with information that again I had no idea about. Things that I can do from my very house that will help the enviroment, like planting a tree in my backyard and recycling.. the proper way. In this exhibit i learned that steel cans can be recycled and became a bicycle and that plastic water bottles can be recycled and become fleece! I learned so much.

IMG_4496IMG_4497


Overall I had a really great experience at the MOS, it refreshed my brain to things that we had already touched base on in class and I also learned so many new things.

Iceland’s Geothermal Energy

Iceland has been an enourmous pioneer to geothermal energy.  Geothermal power facilities currently generate 25% of the country’s total electricity production.

What is Geothermal Energy:

Geothermal energy has been around for thousands of years. This process basically is power obtained from the Earth’s internal heat. There is no fuel burned during this process, which is one of the many benefits of geothermal energy. This turmoil energy is held in the rock and fluids underneath the Earth’s crust. There are also downsides to this though, for example the release of hydrogen sulfide. This is a downside because many have describe to the smell being similar to rotten eggs.

Iceland has over 20 active volcanoes and a lot of hot springs and geysers. Its location makes it one of the most tectonically active locations in the world. Plenty of the building and swimming pools are heated with geothermal hot water. Iceland is now the leading exporter of geothermal expertise to the rest of the world, according to the Trade Council of Iceland. In Iceland 99%of its electricity is made from renewable sources, and 30% of that is geothermal.

References:

  • http://www.scientificamerican.com/article/iceland-geothermal-power/
  • http://environment.nationalgeographic.com/environment/global-warming/geothermal-profile/

Stirling Heat Engine & Peltier Device

Stirling Heat Engine:

From my research on the Stirling heat engine I learned right away what it was, “a little bit like a steam engine that uses no steam! Instead, it heats, cools, and recycles the same air or gas over and over again to produce useful power that can drive a machine.” Chris Woodford explains in his article on explainthatstuff.com I also learned that all though there is so much rave about it now, the Stirling heat engine has been around since 1816!

Alpha_Stirling

Many people refer to this as a closed-cycle, regenerative heat engines. Some describe the Sterling engines are simple, while others think they are complex. There are different designs of the Sterling heat engine, but lets focus on the beta.

How it works:

The Stirling heat engine converts heat energy into mechanical energy by repeating its cycle. First there is cooling and compression. This is when most of the gas on the cooler end of the cylinder. Then there is the transfer and regeneration this is where the displacer piston moves to the right and the cooled gas moves around it to the hotter part of the cylinder on the left. After that is the heating and expansion most of the gas is now on the left in the hot end. It is then heated by fire or another source of heat so that the pressure can grow, absorbing energy. With the gas expanding it now pushes the work piston to the right. During the heating and expansion the  engine modifies heat energy into mechanical energy. Finally there is the transfer and cooling part of the cycle, the displacer piston moves to the left and hot gas moves around it to the cooler part of the cylinder. After this part the cycle restarts.

how-stirling-engine-works 1

The Peltier Device:

Tech Target defines the Peltier device, also known as thermoelectric cooling, as “a temperature difference created by applying a voltage between two electrodes connected to a sample of semiconductor material”. It is beneficial to transfer heat from one medium to another on a small scale.

TEC_pelletsTEC_pellets

How it works:

This device has two side, a cool side and a heated side. The difference in temperatures is about 70 degrees. It uses a lot of  electricity. It pumps the heat from one side to the other. In addition to pumping heat, it also produce heat. When this happens the system cools it self where it needs too.

References:

  • http://www.explainthatstuff.com/how-stirling-engines-work.html
  • http://searchnetworking.techtarget.com/definition/Peltier-effect
  • http://www.activecool.com/technotes/thermoelectric.html

Generator Lab

Prior to starting the generator lab we were told that the more you shake the higher the voltage. My partner Rosanna and I were excited to try it out. We set up our “Wall-up” and got started.
Generator


Rosanna was in charge of the shaking and I was computing everything into the system. everything went pretty smoothly until we got to out 3 trial. The excel format did not gather out information and then from there it went downhill. As we tried to redo everything my computer went to a blue screen. We had chosen my computer to begin with because my partner’s did not work. It was now the end of class and we were still figuring it out.

We managed to finished the last two trails

Here is our data: (all trials lasted a total of 30 seconds)

Trial 1 –

Number of shakes: 64

Sum of the squared voltages: 2.24

Trial 2 –

Number of shakes: 104

Sum of the squared voltages: 1.58

Trial 3 –

Number of shakes: 106

Sum of the squared voltages: 3.82

Trail 4 – 

Number of shakes: 67

Sum of the squared voltages: 1.78

Trial 5 – 

Number of shakes: 61

Sum of the squared voltages: 1.08

And come up with out graph which we showed professor Sonek because to us it looked kind of funny.

shakes chart

He then explain to us that it was not wrong. Even though our marks did not really follow the line. Despite the computer, whom I blame every experiment, I did enjoy this lab!

Tesla’s Electric Car

The Model S a car by Tesla that has receive plenty of rave. It was even the motor trend car of 2013. Theres is more to this very special car though.

tesla

In the article I read by Sam Laird about how the Tesla car actually work, he compared it to a macbook and for me this made it easier to understand. Electricity charges the Model S lithium-ion battery, which in fact is like the one in laptops except that the car’s is a lot more strong then those used in computers.

There is more than one way to and place to charge this electric car. You can have a technician install a High Power Wall Charger in you home, plug it into a 100-volt outlet through a mobile connector, and you can install solar panels in your home. So far in California, Tesla has installed “supercharging” stations on highways and they plan to have these all throughout the United States and Canada.

high power wall charger
High Power Wall Charger
Supercharging Station

Once the Model S is charged, this electricity is then used to power, what was referred to, a watermelon sized mother that not only transforms mechanical power into electricity but also into more electricity.

Electrical Charging Stations

In another article I read by Brad Berman he describes charging electrical cars, in comparison to having a car that runs on gasoline, as complicated. There’s plenty that you need to know having an electrical car and charging station. Some of those things include how they work, where they are located, how to pay, and many more.

I’ve learned a lot from doing research for this blog post but I must say that what surprised me the most was the number of different charging stations that exist. For example there is; Aerovironment, Blink Network, Chargepoint, the Electric Circuit, EVGO, GE Wattsation, Greenlots, Semaconnect, Shorepower Connect, and Tesla Supercharger.

All of these stations vary in price, which could be either monthly subscription, pay as you go, and some can even be free. They also have different amounts of locations.


Here is a video I found that really helped me understand charging stations better: https://www.youtube.com/watch?v=g1K8FQwKUAM


References:

  • http://mashable.com/2013/01/17/tesla-electric-car/#1nfP6E39r5qE
  • http://www.plugincars.com/ultimate-guide-electric-car-charging-networks-126530.html
  • http://auto.howstuffworks.com/electric-car-charging-network.htm

Electricity Generation

In this blog I’ll be discussing about electricity generation from coal-fired, nuclear gas, and finally power plant.

Coal-Fired:

The coal-fired system is a process of approximately four different steps. Rst2.edu calls it a simple process. The four steps consists of heat being created, then the water turns into steam, the steam then turns into turbine, and lastly steam turns back into water, basically creating a cycle. In the first step before the coal is heated it is transformed into talcum powder. that powder is mixed with hot air and then blown to the firebox, with the coal and air mixture creating the maximum heat, bringing us to the second step. Water that is highly purified is pumped through the boiler and then turns into steam by the heat. Duke-energy.com informs that ” The steam reaches temperatures of up to 1,000 degrees Fahrenheit and pressures up to 3,500 pounds per square inch, and is piped to the turbine”. Moving on to the third step, the pressure pushes against turbine blades and turns the turbine shaft. the generator, which is connected to the turning shaft, has magnets that spin within wire coils to produce electricity. Lastly the steam then goes into a condenser, which is a large chamber in the basement of the power plant. This last step it is very significant because millions of gallons of cool water from sources close by are pumped through a network of tubes that are running through the condenser. The water then converts the steam back into water and the cycle restarts and can be used again in the plant.

Screen Shot 2015-10-01 at 11.20.42 PM


Nuclear Power Plant:

This process is much like the coal process. The water is tired into steam then it turn drives turbine generators to make electricity. Duke-energy.com explains that the difference is “the source of heat”.  With this process the heat to make steam is made when uranium atoms split. This process is also known as fusion. The PWRs (Pressurized Water Reactor) keep water under pressure so it can heat but not boil. The heat water goes through tubes in steam generator which permits the water in the steam generator to also turn into steam which then turns into turbine generator. With the BWRs (Boiling Water Reactors) the water that is heated by fission boils and transforms steam to turn the turbine generator. With nuclear gas and both the PWRs and BWRs it is also a cycle where the steam turns back to water and the cycle re-begins.


Screen Shot 2015-10-01 at 11.51.55 PM Screen Shot 2015-10-01 at 11.52.10 PM

Natural Gas:

In this process the natural gas if pumped to the gas turbine and is then mixed with air. It is then burned, in this burning step it converts its chemical energy into heat energy. Not only does the natural gas produce heat but it creates a mixture of gases known as the combustion gas which expands with the heat and creates a build up of pressure. This pressure pushes the combustion gas over the blades of the gas turbine making it spin, changing some of the heat energy into mechanical energy. The generator uses an electromagnetic field to change the mechanical energy to electrical energy. The combustion gas then goes to the heat recovery generator. This heats the pipes filled with water and turns that water into steam before it can escape through the exhaust stack. The hot steam expands and creates high pressure which jets spin the steam turbine. This steam turbine is connected by a shaft to the steam turbine generator that converts the turbine;s mechanical energy to electrical energy. After the steam passes through the turbine it reaches pipes filled with cold water, which cools the steam so that it condenses back into water. The cycle then restarts.

My thoughts on the research:

Out of all the blogs we have done so far this one was my favorite. The info was clear and I learned very much. I noticed many similarities in these three. The method sort of say was very alike, it started at A and went through all these steps and got back to A. A lot of the terminology was the same like


References:

https://www.duke-energy.com/about-energy/generating-electricity/coal-fired-how.asp

http://www.rst2.edu/ties/acidrain/IEcoal/how.htm

http://www.duke-energy.com/about-energy/generating-electricity/nuclear-how.asp

http://www.edfenergy.com/energyfuture/generation-gas


Pulley Lab Blog

My Personal Experience:

Personally, I really enjoyed this lab. I believe it was because the instructions was more straight forward.

My partner and I encountered three minor setbacks while doing this lab. At first the batteries for our “Wall-E’s” were not working which set us back on a time a little. The second set back happened when we started the first five trials and we measured the mass as grams instead of kilograms. We converted all our masses and re did all the trials just to double check all the numbers were still the correct. And finally when making the chart, I had issues making the first set of data’s lab. I believe the second set of data graph is correct but the first one doesn’t seem like the one Professor Sonek displayed in class.

Data:

The lab was quite fascinating really, It was really interesting to see how everything changed because of the power or mass. One simple change of a number could change how fast the weights were lifted. Below is the data my partner and i gathered for both sets of data

Screen Shot 2015-10-01 at 8.37.52 PM part one pulley lab

With this first part we noticed that as we altered the mass it affected with the speed, time and acceleration.

Screen Shot 2015-10-01 at 8.43.20 PM

chart 2 pulley lab pic

This chart looks similar to the one that was displayed in class. With this we kept the mass constant at 0.15 Kg. We noticed that again changes in speed, time, and acceleration based on changing the power.