Monthly Archives: March 2013

Solar Cell Experiment


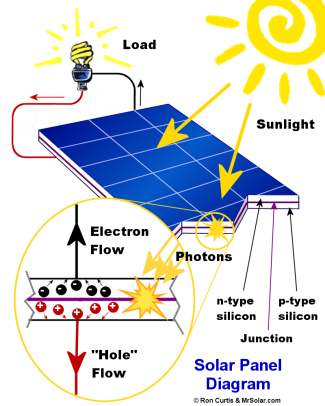
To create solar powered energy the general concept is to take energy from the sun and covert it to energy we can use. Semiconductors contain the materials of silicon and germanium, which have electrical conductivity; Photovoltaic’s are also used for light generating voltages.

To create a Solar Cell Experiment one must first know the difference between
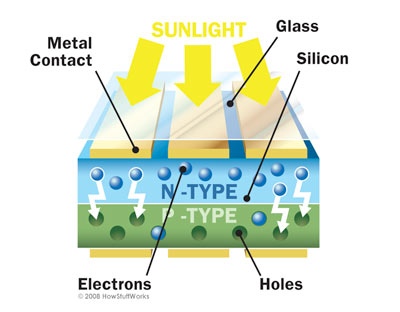
P Type’s (positive)

N Type’s (negative)

DC = Constant Voltage, Direct current (Generated)

AC = Alternative Voltage (Used in daily lives)

Voltage = is driving force that moves charge around a circuit


Work = Energy = Voltage x Charge


*One way to think of this is by comparing it to a pipe system.


Light Intensity= Measure of the energy of light

*the higher the intensity the more photons generated


Current (generated)                        Amperes

___________                        ____________

(input) Power            =                  Watts


Photovoltaic =amount of current/ voltage depends on wavelength


Silicon= Best at infrared wavelengths


Spectral Response= Ratio of the current generated by the solar cell to the power incident on the solar level


The Experiment:

To find if the signal depends on the intensity of light (moving the light closer and farther away from the signal box) and if the signal changes due to color filter changes (red, yellow, blue, and purple).


1) Measure distance between solar cell and light

2) Shine light and run LabView program

3) Average the data that appears in Excel file

4) Repeat for 4 different values of distance

5) Plot average voltage (intensity) vs. Distance

6) Repeat steps (1-3) for 4 different colored filters


The results for Distance:

1)   Distance = 0 cm, Average = -0.04805

2)   Distance = 2 cm, Average = 0.317607

3)   Distance = 3 cm, Average = 0.244476

4)   Distance = 1 cm, Average = 0.290664

Light Distance Results:


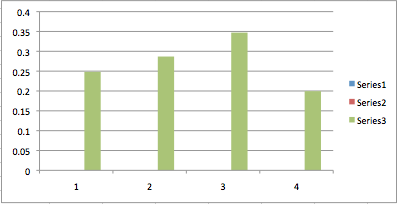
The results for Color Filters:

1)   Color Red, Distance = 0 cm, Average = 0.248325

2)   Color Yellow, Distance = 0cm, Average = 0.286815

3)   Color Blue, Distance = 0 cm, Average = 0.347116

4)   Color Purple, Distance = 0 cm, Average = 0.199571

Color Filter table:

Color graph

Faraday’s Law

Faraday’s Law explained through video:

Michael Faraday discovered Faraday’s law in 1831; this law can be described as a change in a magnetic surrounding of a coil of wire that will cause voltage or emf to be generated. This can happen due to any change in the surrounding. The change could be done by changing the magnetic field strength, changing the position of the magnet either closer or farther away, and changing the distance between the coil and the magnetic field and so on thus creating electricity.

Faraday’s law can be put to use in many different ways, one way is by creating a flashlight that doesn’t need to run on batteries and it can be generated with a few shakes. Once the materials are bought to assemble this flashlight, which are generally inexpensive, it only takes a few steps to get the flashlight ready. On the ehow.com site there is an article written to give specific instructions and materials,

“You’ll need an old flashlight, a plastic tube that fits snugly inside the flashlight, thin enameled copper wire, two pieces of heavy gauge wire, two pieces of silicone rubber about 1/4 inches thick, two pieces of insulated wires, a 5.5 V, 1F electrolytic capacitor, an on-off switch, a graetz circuit, an LED diode and a neodymium magnet. The only tools you’ll need are a soldering iron, wire cutters and a drill” (ehow.com).

Once these materials are gathered one must follow the step by step instructions: fit the plastic tube into the flashlight, cut so it fits snuggly, next, take the copper coil and wrap it around the tube making sure it is around the same length as the magnet being used, and make sure to wind it in one direction only. After thoroughly winding, leave the ends open for connection later. After closing the tube and securing the magnet, drill 4 holes into the tube and adding gauge wire through one side. Then, cut a piece of rubber and push it into the end of the tube, then repeat this process on the other side. Next solder the insulated wires to the LED, and then solder the gratz circuit to the electrolytic capacitor, making sure the positive and negative match. Then solder the ends of your coil to the gratz circuit. Now solder one insulated wire from your lead to the gratz, and a second insulated wire to the other lead from the gratz for later usage. (ehow.com).

Finally after inserting the creation into the tube and finishing with the switch on the outside, a flashlight is created! Now take the flashlight and shake, this will make the coil and the magnet create and electric charge.

Faraday’s law was an invention of genius thought and has been helpful to the world in many ways ever since, “Faraday’s law gives rise to countless technological applications too. The law has far-reaching consequences that have revolutionized the living of mankind after its discovery. Faraday’s discovery of electromagnetic induction has numerous industrial, technological, medical and other applications”(ICT).


Simmons, Larry. “DIY Shake Flashlight.” Ehow.com. N.p., n.d. Web. 7 Mar. 2013. <http://www.ehow.com/way_5371860_diy-shake-flashlight.html>.


“Applications of Faraday’s Law.” ICT. Wiki, 25 Feb. 2011. Web. 7 Mar. 2013. <http://202.141.40.218/wiki/index.php/Applications_of_Faraday’s_law>.


Faraday's Law Faraday's Law