Poll Everywhere
Integrating activities in Blackboard
You can integrate Poll Everywhere activities into your Blackboard course as a web link or embedded in the course content. You can also export the results directly to the Grade Center.
The process is as follows:

Import Roster
- Open your Blackboard course you want to add Poll Everywhere activities to.
- Select Course Content (or menu selection where you want to add the poll).
- Select Build Content → Poll Everywhere.
- Enter the following information in the Create Poll Everywhere form:
- Name: Poll Everywhere Roster
- Description: Item used to import course roster to Poll Everywhere
- Permit Users to View this Content: No
- Click on Submit.
- Result: The Poll Everywhere Roster link is added to the bottom of the page
- Click on the Poll Everywhere Roster link.

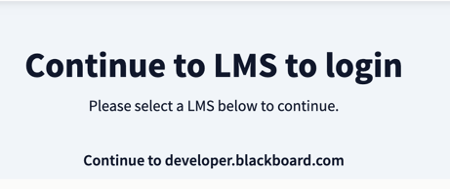
- Result: Poll Everywhere will open.
- Click on Continue to developer.blackboard.com

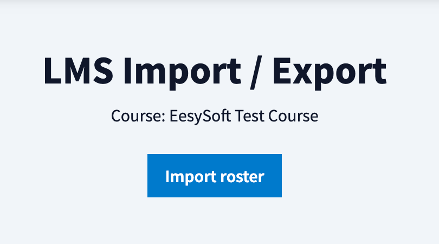
- Click on Import roster.

- Result: Poll Everywhere will begin the process of importing the course roster.
- Click on Go to Participants page then click on Activities.
- Result: This is where you can begin to create Poll Everywhere Activities.

Create Poll Everywhere Activity
- In Poll Everywhere, click on Activities.
- Click on Create on the top left of your Activities
- Select the activity you would like to create.
- Enter your question or prompt.
- Multiple choice
- Word cloud, Q&A, or Open-ended
- Rank order poll
- Clickable image
- Survey
- When you’re ready, click the create button to build your activity and save it to your account.
Add Activity Link in Blackboard Course
- In Poll Everywhere, on the Activities page, next to the name of the activity you want to add, click on Actions → Copy response link

- Return to Blackboard course.
- Select Course Content (or menu selection where you want to add the poll).
- Select Build Content → Web link.
- Enter the following information in the Create Web Link form
- Name: whatever name you’d like
- URL: paste link from Poll Everywhere
- Description Text: (optional) may be helpful to add instructions
- Permit Users to View this Content: Yes
- Open in New Window: Yes
- Click Submit.
Embed Activities in Blackboard Course
You can use the use the Item tool in Blackboard to embed Poll Everywhere activities.
- In Poll Everywhere, on the Activities page, click on the title of the activity you want to embed.
- Select the Present tab (near top right of the window).
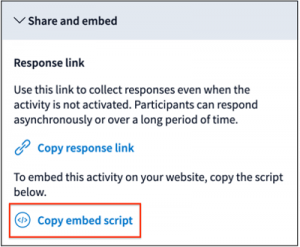
- Click Share and embed.
- Under Response link, click on Copy embed script.
- Return to Blackboard
- Select Course Content (or menu selection where you want to add the poll).
- Select Build Content → Item
- On the Text Content Editor toolbar, click on the Source code icon
 .
. - Paste Poll Everywhere Activity embed script.
- Click Save.

Export to Grade Center
- Open your Blackboard course you want to add Poll Everywhere activities to.
- Select Course Content (or menu selection where you want to add the poll).
- Select Build Content → Poll Everywhere.
- Enter the following information in the Create Poll Everywhere form:
- Name: Poll Everywhere Grades
- Description: Item used to import Poll Everywhere grades
- Permit Users to View this Content: No
- Click on Submit.
- Result: The Poll Everywhere Grades link is added to the bottom of the page
- Click on the Poll Everywhere Grades
- Result: Poll Everywhere will open.
- Click on Create Gradebook for report.
- Result: This will open the Poll Everywhere report creation tool.
- Select the activities you want to include in the Grade Center.
- Click Finish.
- Result: The name of the report will be automatically set to a title from one of your Blackboard grade columns, but you can use Rename to change it.
- Click Export on the bottom right to export the report back to Blackboard. You will see a popup to confirm which course is receiving the gradebook data. Click Close.
- Return to Blackboard
- Open the Grade Center to see the new grade column and data created by the export. Be aware that the data transfer of the gradebook export is not immediate. It may take up to a couple of minutes for grades to appear for all students.
Learn the basics
Creating activities
You will have several options for types of activities to build, including multiple choice questions, word clouds, clickable images, surveys, open-ended questions, and more. A few examples are shown below. More information on building different activities can be found on Poll Everywhere’s Getting Started.
Multiple choice

Word cloud

Survey
(Note: Surveys allow you to ask multiple questions at once. These can be responded to privately at the student’s own pace, which make them useful for quizzing.)

Activating activities
To activate your activity, navigate to your My Polls page and select Activate.

This can also be done from the poll menu, which additionally allows you to adjust visual settings, show responses, lock the activity, clear responses, and present in full screen mode.

Deactivating activities
To end your activity, select Lock from the poll menu. This will prevent users from responding to the activity; however, they will still be able to view it on the presenter page. In order to remove the activity from your My Polls page, select Deactivate.
Presenting your activity
- To present your activity, first show the instructions so participants know how to respond. Polls can be accessed through your personal link (PollEv.com/username) or via text message. Instructions to join are displayed live on the results chart, or you can send an email to participants with instructions before the activity begins. For presentation ideas, see best practices for presenting your polls.

- When presenting your activity, you have the option of hiding responses until all participants have submitted or you can show results in real-time. In the poll menu, Show Responses will be highlighted in blue when it is active and gray when inactive.
- The easiest way to display activities is through the web application. However, activities may also be displayed by embedding them in a PowerPoint – to do this, you must first install the PollEv Presenter App. More information can be found on Poll Everywhere’s Getting Started.

Additional resources
Getting Started
Live Webinars
Explore Poll Everywhere features
Create Polls
Gradebook Reports
Polls in PowerPoint
Competitions