Final Coffee Cup Experiment


coffee_cup_thumb

For our final project, we created a coffee cup experiment that measured which common coffee cup insulates heat the best and for the longest amount of time.  We were curious about which material would insulate the best because, since millions of people in the world drink coffee or some other hot beverage daily, we wanted to see which material actually worked the best and was the most efficient.  The three most common materials used to carry around a hot beverage seem to be a plastic travel mug, a paper mug, and a styrofoam cup.  We decided that these were going to be the three containers that we would test.

Our theory, or hypothesis, before we ran the experiment was that the plastic travel mug would insulate the best because that is what they are designed to do.  These mugs are reusable, popular, and seem to hold heat for a fair amount of time.  We knew from the beginning that the disposable paper mug was not going to preform well, so we were mainly interested in the results from the plastic travel mug and the styrofoam cup.  Also, based on our own experiences purchasing hot drinks over time in each of these different materials, we thought that either the styrofoam cup or the travel mug would preform the best.

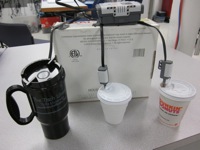
For this experiment, we didn’t need a lot of materials; We used: 1 NXT brick, 1 paper mug (with lid), 1 styrofoam cup (with lid), 1 plastic travel mug (with lid), 3 NXT temperature sensors, LabView computer software, hot water, and a permanent marker to mark where the water line was.  First, we set up the LabView and NXT brick with the adaptors to the computer.  Then, we marked a line on each cup to where we were going to pour the hot water in.  Next, we poured hot water into each cup up to the line that we marked.  Finally, the temperature probes go in, and the lids go on the containers.  Over the next 15 minutes we measured the temperature decrease of each container every 10 seconds.  This data was captured in the LabView program, and subsequently transferred to an Excel Document.  At the end of the experiment, all of the temperature data is collected and the water is disposed of and everything is put away.

Our results for this experiment were fairly on par with our hypothesis in the beginning.  The paper mug did in fact lose heat the fastest.  The starting temperature for the hot water was 158 Degrees Farenheit, and the paper mug’s temperature rapidly fell.  However, we were surprised to find out that the styrofoam cup insulated the heat better than the plastic travel mug.  Since travel mugs are designed to insulate, we were shocked to see that the inexpensive styrofoam cup hold out the longest.

Overall, we are hoping that the students performing this experiment will gather similar results that we did, that will benefit owners of coffee shops.  Since everyone is trying to make themselves and their businesses more efficient, these results will be important for them when it comes time for them to purchase cup materials.  We also hope that the students can see the relationship between this experiment and renewable energy.  Having an efficient product that can insulate heat energy best is important.  In addition to that, styrofoam is not good for the environment, while paper mugs can be recycled and travel mugs reused.  We hope that students can come to a conclusion on whether stores should invest in a cheap, efficient product that has a greater negative effect on the environment, or choose the less efficient product that can be reused/recycled.  In the end, the group of students did successfully gather results that were similar to ours, and the understood the purpose of the experiment.

   IMG_2549                                       IMG_2548                                   IMG_2547

Below is a copy of our handout that the other group received.

coffee_cup_thumb

COFFEE CUP EXPERIMENT

Purpose: To determine which container best insulates heat energy the longest.


Background: This particular experiment will help coffee shop owners decide which type of container will keep their product insulated for the longest amount of time for its customers. In the exhibition, hot water is placed into three types of coffee containers. The containers include a Styrofoam cup, plastic mug and paper cup. Thermometers collect the temperatures of the liquid in each cup over the course of a half hour. Keep in mind that the water started at an equal temperature and equal level in all three containers. Every ten seconds a temperature is recorded.  Efficiency and sustainability is very important these days, and learning which container best insulates will help that cause.  Using a container that best insulates heat will cut down on energy to re-heat the beverage, while also keeping your beverage warm.

Procedure:

Setup: Collect your materials: 1 paper mug (with lid), 1 styrofoam mug (with lid), 1 plastic travel mug (with lid), 1 NXT Brick with 3 adaptors cords, 3 NXT temperature probes, hot water, LabView software, and a permanent marker.

Mark a line on each container to where the hot water will be poured in.  Next, set up the NXT brick with the cables and sensors and open up the LabView software.  Then, pour in the hot water up to the marked line and put in the NXT temperature probes.  Finally put the lids on (as best as you can) to each container and begin to gather your results.

Data Collection: The NXT temperature probes will be constantly measuring the temperature of the hot water inside each cup.  This experiment will run for 30 minutes, with the sensors gathering temperature data every 10 seconds.  After you have all of your data in the LabView software, open up an Excel Document, and begin to record/graph your data.

Data:


Container At Starting Temperature (F) After 10 Seconds After 30

Seconds

After 1 Minute After 5 Minutes After 10

Minutes

After 20

Minutes

After 30

Minutes

Travel Mug:               
Styrofoam Cup:              
Paper Mug:              

Analysis: 1. Which container insulated the heat the longest?

2. Which container lost heat the fastest?

3. Which container material would you suggest to a store owner?  Does the material and it’s relationship to the environment affect your decision?


Group #4 Project Outline

Coffee Cup Experiment

For our group project, we’ll be testing how well three different cups filled with hot coffee (i.e. styrofoam, plastic, or paper) insulate heat.  We are interested in seeing which cup material will insulate the heat the best and the longest.  This experiment relates to energy efficiency because having a container that insulates heat best will reduce the amount of heat energy lost.  Since energy cannot be created or destroyed, the goal of our experiment will be to see which material can best save energy and retain the heat inside of the cup.  In addition, the results from our experiment will be greatly beneficial for coffee shop owners who are always looking for ways to improve their costs and efficiency.  However, our group is also interested in the environmental cost factor.  For instance, styrofoam cups are less expensive to produce than are plastic travel mugs, but they also have a greater negative effect on the environment than a reusable plastic travel mug.

Materials: 3 cups: 1 styrofoam, 1 plastic, and 1 paper;  hot water;  3 temperature probes;  timer.

Objective: We want to see which cup material will best insulate the heat from the hot water for the longest time.  We also want to know which cup material will have a less negative effect on the environment.

Hypothesis: We think that the styrofoam cup will retain the heat the longest.  However, we think that the styrofoam cup will have more of a negative effect on the environment than the recyclable paper cups or the reusable plastic mugs.


Group Project Brainstorming

This past week in class we met with our final project groups and began to brainstorm for our final project.  During this meeting, we basically just began to think of some ideas that we could realistically create for the class and started to look on some websites for experiments.  The websites that the professor provided were helpful, and in addition to that, we googled some more to explore all of our options.

First, we had the idea to order a toy car that runs solely on water power.  However, we realized that that would be potentially problematic when it came time to recording data and how it all comes back to renewable energy.  Even though the car is a perfect example of renewable energy (it runs on water power), we would have a difficult time having the rest of the class collect data on it.

Finally, one of our group members found an experiment online that measures which container retains heat from coffee the longest.  We all decided that this was a great idea and we will be able to relate it back to renewable energy.  Basically the experiment calls for having three different types of cups (i.e. styrofoam, glass, or paper) and filling them with a hot substance and constantly measuring the temperature of the contents.  In the end, we want to see which container is best able to retain the heat of the fluid inside.

We realized that we will have to create a program through LabView in order for the temperature probes to receive constant data.  From there, though, we just have to complete the experiment and perform it in front of the class.

Museum of Science Visit

This past week in class we all traveled to the Museum of Science (MOS) to see some examples of renewable/green energy for our final projects.  Being a huge fan of the MOS, I was really excited to check out this exhibit.

While we were there, we all looked at a display of how a wind turbine works.  I was really impressed by how the staff had two small gears behind plexiglass that you could turn and imitate the turbine working.  For example, I am the wind and I’m turning the blades of the turbine and we were able to see these gears move and how much energy would be created because of it.  Another really cool part of the exhibit was this touch-screen computer where you could look up on a map of Massachusetts where all of the wind turbines are, any coal factories, and basically where all renewable and non-renewable energy producers were located within the state.  It was interesting to see how close some of these places were to my home.

My favorite piece of the exhibit was this machine that had a gauge that went from green (good) to red (environmentally bad) whenever you put these magnetic disks on it.  We were able to place the disks in slots labeled “nuclear energy,” “solar energy,” and “coal powered energy,” etc., and this machine would move the gauge to either good or bad.  This machine was supposed to represent the environmental impacts that would ensue if these sources of energy were running Boston.  I really liked this one because we were able to see how good or bad each option was and how it would effect the city.

Towards the end, Tom Vales was showing a few of us the steam powered machine towards the back of the exhibit near the model trains and cars were.  He was explaining to us how much power this machine would have created and how dangerous they were back in the day.  I really enjoyed this talk with Tom because he is a treasure trove of knowledge and it was interesting to imagine this steam powered machine on at full blast.


Tom Vales Talk

Recently, one of Suffolk’s valuable staff members came to talk to us about different machines throughout history and how they were revolutionary then and now.  Having never seen a large majority of these machines, I thought that it was really cool to see things that revolutionized work hundreds of years ago, and some that were the beginnings of modern machines that we know and rely on today.

Seeing the Sterling Engine, which is about 200 years old, was really cool.  Being able to see a piece of equipment that was invented so long ago was really neat.  The Sterling Engine, we learned, is a hot air engine and moves hot and cold air in its workings.  With this machine there is very low friction, can be powered by solar power, and has an 80% efficiency rate!  I think it would be really cool to see one of these engines on a much larger scale.

One machine that I thought was really awesome was the Mandocino Motor.  This motor used magnetic levitation and therefore had almost no friction!  Seeing something levitate because of magnets was really cool, and it even spun because of the magnets.  Even though I’m not really sure where this piece would be functional in a real life setting, it was really cool to look at.

Lastly, my favorite of the equipment that Tom Vales brought down was the Tesla Coil and the Violet Ray Machines.  The big Tesla Coil reminded me of the electricity exhibit at the Museum of Science, and it was so cool seeing Tom hold a stick to the coil and electricity coming out.  Imagine running your house off of this free, wireless electricity?!  Something else I learned with this machine was the “Skin Effect.”  That is when the electricity just travels on the surface, and not through it.  The Skin Effect allowed Tom to touch the coil with the stick and not be shocked.  Also, seeing Tom use the UV lights with the coil was really cool.  I’ve never seen lights just light up like that on their own (i.e. the wireless electricity).

Overall, Tom Vales’ talk was really interesting and he showed us some really cool things.  I’ll definitely be looking into Tom’s help for our final project.